Showing posts with label DIY. Show all posts

Monday, March 30, 2015

DIY Macro Ringlight - Test shots on my dolls!


Oooh!!! This worked out sooo much better than I thought it would!

 I made a ringlight out of some spare parts I had lying around, and it works so beautifully with my dolls T-T They do look a bit dusty, haven't had much time to play with them lately :( Clover (Iplehouse KID Lonnie) needs a bit more attention, her hair is so dishevelled hehehe

My favourite girl, Ginger (Unoa Lusis), she looks like a corpse here but I still love how all the details of her face up show up here.

And of course, who can forget Kizuna (Danny Choo Smartdoll) :)

Link to the free tutorial and some test shots on smaller items here:

http://snowfern-clover.blogspot.sg/2015/03/diy-ring-light-for-macro-photography.html

Direct link to Instructable with free PDF tutorial download here:

http://www.instructables.com/id/DIY-LED-Ring-Light-for-MiniaturesMacro-Photography/

I just want to add that I am so so happy to have had my very first Instructable featured today in the "Tech" section of Instructables! Go me!


If you have found my tutorial useful, please vote for my Instructable as I have entered it into a "Tools Contest", if you are on a mobile phone, the vote button is on the top left, otherwise, it is on the top right of the page!


Remember to share with me pictures of your ring light too, if you have made one from this tutorial!


Link to the free tutorial and some test shots on smaller items here:

http://snowfern-clover.blogspot.sg/2015/03/diy-ring-light-for-macro-photography.html

Direct link to Instructable with free PDF tutorial download here:

http://www.instructables.com/id/DIY-LED-Ring-Light-for-MiniaturesMacro-Photography/


Friday, March 20, 2015

1:3 SD sized photography props


Yikes! This blog has been severely neglected, I didn't even post about Kizuna Yumeno, my very first SD-sized doll :O Nor the long-promised SGDC2014 event report....gomen~! She was a birthday cum anniversary gift from the fiance :D

I have been kept busy with pain management, wedding preparations, and even some renovation talks (will be moving out after my wedding)...whatever little useful time I had left was devoted to fulfilling the final custom request accepted in 2014. I hope to finish that by June before things go into full swing, but ack, need to earn some $ to tide me over, so I wanted to list some more 1:3 items and hopefully get some sales.... -_-"

Being in a lot of pain most of the day means I'm miserable a lot of the time, means I need to find ways to keep happy, and making stuff for my dolls keeps me happy. So I make stuff.

Better, cheaper, and faster than therapy.

There's not a lot of progress photos, but here are a few that I found on my phone (couldn't keep it in and had to share progress with the bf, so pleased with myself for figuring stuff out HAHAHAHA)

With 1:3 scale, things are....woah. really large. especially when I'm used to 1:12 and smaller. I had to find ways to reduce the weight of the props as well. I will list materials I used and where I got them at the end of the post, as most of you know I don't tend to nurture my social media very well, sorry :( Hurts to sit at the computer and my fat fingers make it difficult to type on my teeny smart phone. 

As always, I didn't draw up any plans, just measured the IKEA shelf that was supposed to be Kizuna's home so it would fit. I want to also make it light and portable so I can move it to my window for photoshoots.

IIRC it's about 70cm height vs 40cm wide. All I knew was, I wanted a window. The window is a sliding window cos, I like stuff that works in mini too :D :D :D  CAN YOU IMAGINE!! A PIE COOLING ON THE WINDOW SILL!!!! It all started with this idea, and I just made everything around the 2 pieces of glass which were 5" x 7" photo frame glass that I had lying around. Not sure why I even had them at home, but ey, whatever works!!! (oh ey, I think might have been left over from a project I made for the fiance...hrm.)

*stares off dreamily in a painkiller haze*

Ah anyway. This was a test shot to see how well she stood against the window, or if I needed to add more width/height.

Tara~~!!! I initially wanted a smoother finish for the upper half, but screwed up the last piece of PVC foam board and had -just enough- 2cm wide wooden strips....I think it all worked out great :D :D :D 

Please excuse the really messy background. I took this shot to show off the chair to Asuka, she didn't even notice the chair and thought I was bragging about the knitted top XD which yeah, I did, about 3 mths ago!!!

I first discovered http://ana-white.com/ a few years back when I was randomly surfing late at night for prop ideas pre-event (forget which one) on my phone, but never quite found the time to work on scaling down the plans. The site is chock full of relatively easy plans which I find easily adapted into miniature, especially 1:3 or 1:4! Was tempted to use inkscape to scale it down to fit whatever random wooden strips I had stashed away, but the site uses imperial measurements, so I gave up on doing all the crazy math and just re-drew everything on graph paper, the old fashioned way. Works better with my doll anyway.

It's about 12cm wide. I think. *squints at photos*
(painkillers really fuzz up my memory worse than it already was)
All I know was, I needed it much taller than the plans specified, as Kizuna is a very leggy woman kekeke. I think the legs were about 19cm, all I know is the seat had to be about 20cm off the ground so she can sit with proper posture (HAHA) since her legs can't be tucked in at angles less than 90 degrees.


The table was just a few pieces of leftover wood strips put together to make a foldable table. The tabletop was not attached so I can switch it out for other tabletops, and I prefer the foldable legs so I can make it lower or higher depending on what I required for photoshoots. A tad flimsy, but it works :D

Tabletop was an old whiteboard thingy. Warped, so I reinforced and flattened it with wood strips too.

Then just after I dug out some old props, it started to rain and my photos turned out quite grey. bah. good excuse to go lie down after the 4 days of working on these few props.

Overall, pretty pleased with how they turned out. The black wall behind her is a leftover shelf board from her IKEA shelf abode XD I proped everything against my window for this test shoot, I RIKES. Maybe I'll build her a kitchen sink, cabinets....worktop.....oven....AUGHHHH NEED MORE MATERIAL TIME AND AUGHHHHHHH I WANNA PLAYYYYYYYYYYYYYYY

Materials used:
Window glass: IKEA RIBBA photo frame glass 5"x 7"
Wooden strips for everything: Various widths from Daiso (Singapore)
Table Top: Portable Whiteboard from Popular Bookstore (Singapore)
Chair plans: Heavily adapted from http://ana-white.com/2010/10/squared2-chair
Wood Glue, Acrylic Paint, PVC Foam Board (Art Friend), Foam Glue, Pins (to reinforce joints), Lego (as Mitre/Square), Fine grit sandpaper, Filler (for chair joints, not necessary but a nice finishing touch, you can probably use wood putty or similar)

Model: Kizuna Yumeno, Smartdoll by Danny Choo
Wig + Jeans: Default
Knitted top: Made by me, pattern adapted from http://www.ravelry.com/patterns/library/blush-2
Hairband + Coffee Mug + Donuts: Made by me
Macbook: Gift from Cousin, pocket mirror
Ceramic Plate: Random purchase ages ago, forgot where

Thursday, April 3, 2014

Saffron


Meet Saffron :) This will be the obligatory box opening post XD I've actually reserved "saffron-tea.blogspot.com" but unless I give her some really crazy back story (which i do not have the imagination for) I doubt that blog will be updated XD

She is a Unoa Sist, Fresh Skin. Alchemic Labo, the company that produces her, used to only cater to the Japanese market, meaning they were pretty difficult to come by. I was reluctant to purchase a 2nd hand version, and so kept waiting for the chance that pre-orders for International orders would eventually be available.....

I waited for close to 6 years! I first came across photos of Unoa Lusis back in mid 2008 when I was trying to make my own BJD and instantly fell in love with these dolls. My hopes started waning as year after year, no pre-orders were made available, and I missed the lottery in -I think- 2012.....but this year in January, a 2 week window was open for pre-orders!! The fiance (then-bf) had promised me one as soon as it became available, and since I did not ask for a birthday gift last year, it became my belated birthday gift!!! (yeah, I'm fussy when it comes to gifts as I don't have much space and am very particular with what enters my room :X) I quickly placed an order, and added 3 face plates so I could have some practice, as well as versatility :)

And so.....on March 31st, Saffron arrived! This will be a lengthy and picture heavy post, so I'll divide it into 4 parts - Box Opening, Faceup, Sewing her first outfit, and Review.


=============================================
Box Opening
=============================================


Here's Eva welcoming Saffron :P 


TA-DAH!~~~~ That's Ahma's arm, she was even more excited for this box opening as she's now familiar with what I do XD She kept remarking, "This one is much bigger than the other one!" XD XD XD


DUN-DUN-DUNNNNN!!!!!! The biggest surprise was seeing that she came assembled :O


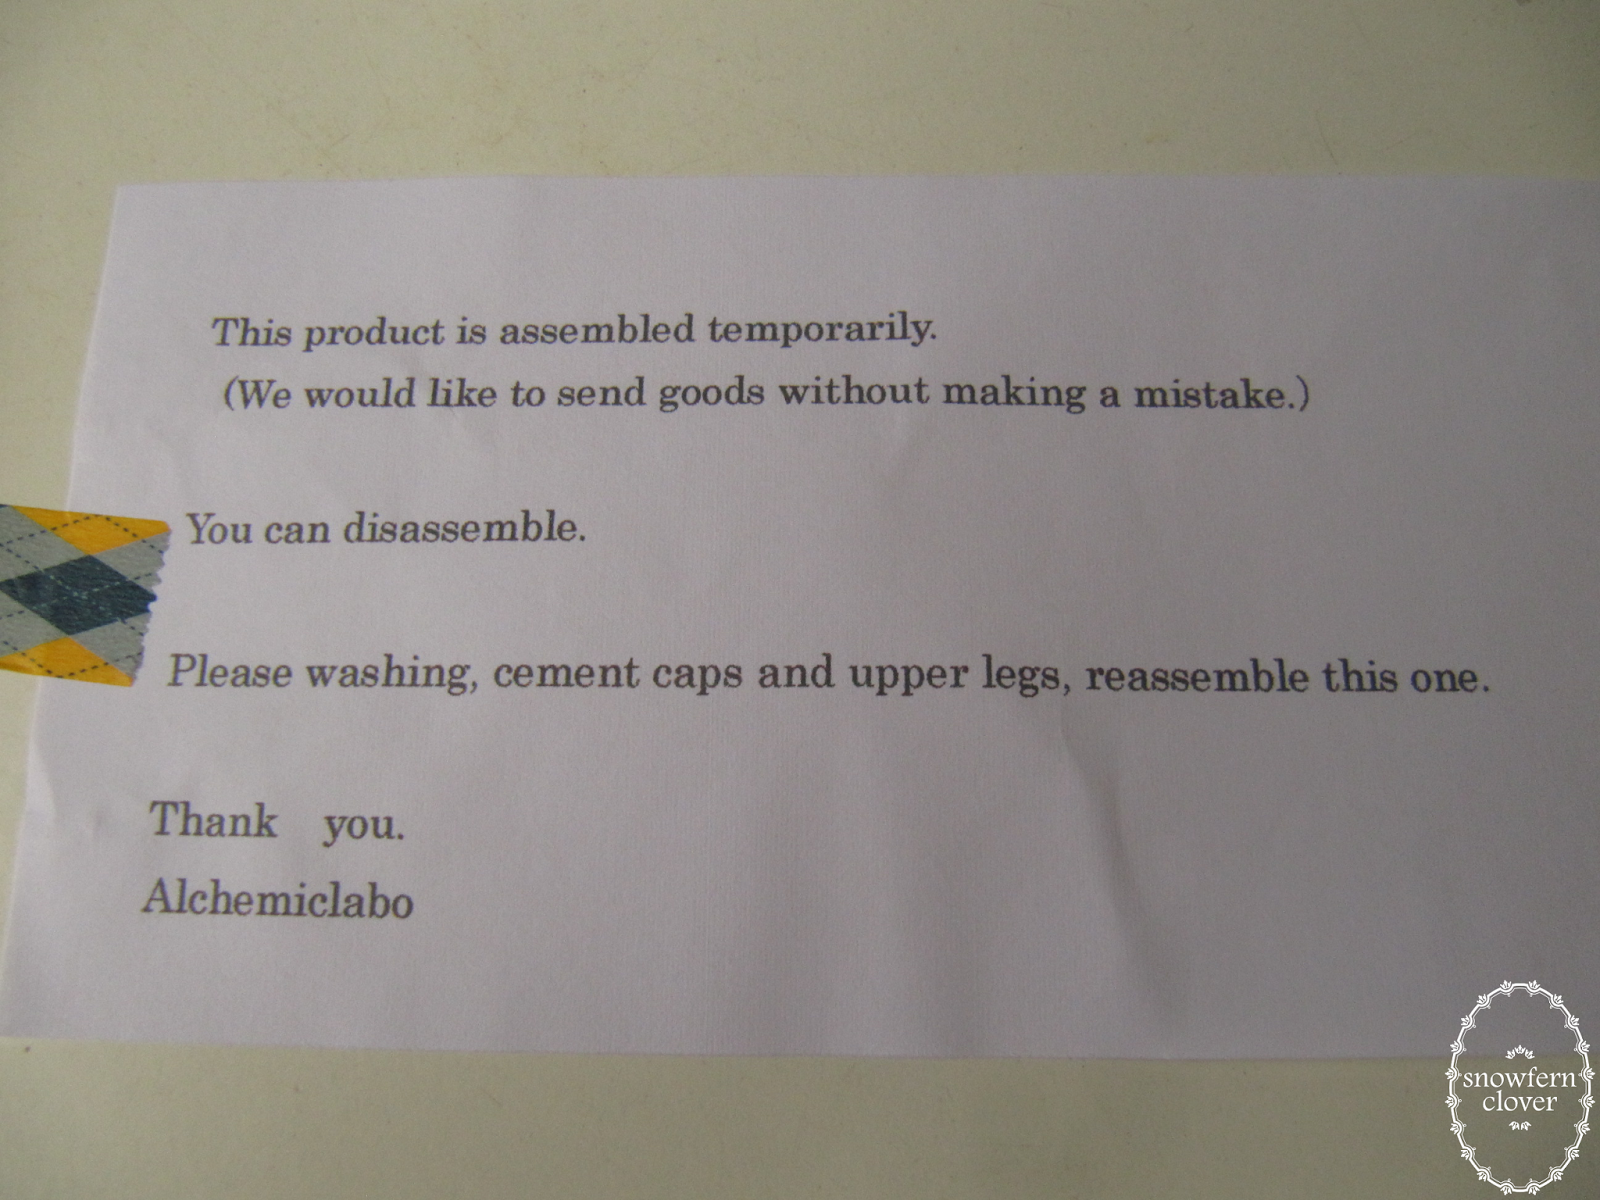
There was an accompanying note explaining why she was strung!

 Another surprise was the paper pattern to use when designing outfits for her O.O LOVE IT. Can't wait to make fitted clothing :D

Although the instructions were in Japanese, there were enough illustrations to help with the re-assembly.  
And best of all, even though it was stated that the eyes would be randomly assigned, I did add a note during checkout that I would prefer Blue/Gray eyes if at all possible....am not sure if it was a coincidence or really wonderful customer service, but I got the eyes I wanted!!! ^_^V

They are acrylic (I think) and have holes drilled for the eye mechanism. Will use them for Lusis!

Ahma kept asking how big she was compared to Clover, and so I quickly threw on a dress I knitted which was too large for Clover to protect Saffron's modesty. Ahma couldn't help but fiddle with her heheheheheh. It was quite sweet watching her marvel at dolls...quite a contrast to when Clover first arrived (she had a hard time understanding why adults would still play with dolls hurhur)

 Sisters! They're both 1:4 scale, or classified under Asian Mini/MSD sized dolls in DoA (I think).

 I coincidentally had 3 spare pairs of 12mm eyes which I had purchased for Clover, which were quickly put to use! The right most one is the Sist Decadent faceplate, I'm wondering if I can mod her into some cyborg type character....*taps chin*. Anyhow the 2 on the left are the Lusis Default and Wink faceplates. TOTES ADORBS. The doll also came with a faux fur (mohair?) white wig, which TBH I'm not too fond of, but maybe after some dyeing I can work it into something more appealing.

Oh and she's in her large bust option (purchased separately) in this photo :) Clover is enough of a tomboy for them both!

=============================================
Faceup
=============================================


As I was going to wash and re-string Saffron, I thought that Clover needed a bath too. I had made the mistake of spraying her body with MSC even though I had little-to-no-intention of body blushing her....so all I did was wet sand the more visible and sharp flash lines.

WIP photo for quality control :P

So.....since I had done Clover's faceup before, I decided to be braver with Saffron's makeup and go with bolder colours. Although I initially had no idea who the Unoa Sist would become, after a lengthy discussion with CH...I thought that Sist would either be Slutty or Demure. And then I viewed a video of a singer dressed like a Pin-up girl and her deep red lipstick captured my attention. Saffron would be a songstress with a happy, almost burlesque style :) But more sweet than slutty *cough* 

I won't go into detail about my process as I've already documented it here, when I did Clover's face up.


This was my 2nd attempt at Saffron's face, the first one was so disastrous I had to clean it off, and re-start the whole process the following day. 4 hours down the drain (stayed up till 3am the first try) T-T But I'm glad I didn't settle for an inferior face-up...because I am totally loving her current look!


Instagram filters make everything look better :E
(I think she looks like Disney's Ariel in this photo!)

She looks so different from different angles!

So where did inspiration for her faceup come from?


Note any similarities?

I had come across this photo in my facebook photostream on a random day...and immediately knew this was how I was going to style her. I opted to go for a friendlier eyebrow shape and keep the red-head tone as she's Clover's sister after all. And at around the same time I had read that blue eyes + red hair is the rarest combination for redheads, so it all worked out great! The wig is an old one I made and as Clover's head is a little larger, I temporarily stuck doublesided tape to hold it down (NOT RECOMMENDED but eh I'm not selling her and I know how to handle tape residue :X) I'll be making a new wig specifically for her but I'm really partial to this combination now. 

Eyes were the default that came with Clover, and I don't feel brave enough to drill holes in it, so they're held in place with blu-tack.


More closeups of her faceup detail. Yeah, it's not perfect, but I'm improving I think. I used heavily-modified eyelashes from Daiso this time since her more dramatic look required more dramatic lashes :P 

I've already had a number of comments about her lips, so I thought to add my process here for those interested:

- base layer of medium pink pastels
- MSC
- Folk art Napthol Crimson, thinned and then drybrushed
- Shiny/glittery eyeshadow dabbed onto previous layer before fully dried. It was from a knockoff MAC eyeshadow palette (not recommended since it's not waterbased, but I figure she's already got MSC coats to protect and it's quite powdery like mica powder so I chanced it) on lower lip, centre area to act like lip-gloss
- Napthol Crimson, used thin liner brush to emphasize outline of lips and increase emphasis of lip-gloss area
- Napthol Crimson + dab of black, highlight mouth slit (?!) with liner brush
- Folkart Gloss Varnish

I want to emphasize that this is not recommended if you're intending to do professional grade face-ups, but since I have no intention of selling my grail doll, I'm quite happy to experiment and in any case, these face plates are far more affordable and replaceable so I'm not too bothered.

I was also careful to keep the line gentle, so that there's more of a subtle transition than a harsh red outline which happened on my first attempt. 

As to the brushes, I used the same ones in the faceup for Clover.

For the eyebrows, they were done differently than Clover's, I painted in the individual hairs...and although it was tempting to sand off the eyebrows in the sculpt, it actually served as a good guide and provides more dimension, so I left it in.

This time round, the only reference I used was the Bec Winnel artwork, so the whole process was much faster, though it did take about 3 hrs the 2nd time round.


=============================================
Sewing the Infinity Dress
=============================================


I had subscribed to a thread on DoA in which Silver Identity had kindly created a tutorial with measurements catered to a MiniFee. Thank You! (haha I don't think he/she reads my blog but yeah, I appreciate it!) I know that some of you have mentioned that it's difficult to get on DoA, and personally I've been having issues with accessing except on my mobile, so I can't fetch the link either...but there are soooo many infinity dress tutorials out there so just do a quick search on DoA or Google and you should be golden.

http://www.denofangels.com/forums/showthread.php?p=7902149

Just for those who are wondering and might want to use my measurements for your own Unoa, here are the dimensions:

Straps - 5cm (W) x 63cm (L)
Waist - 15cm x 6cm
Skirt Length - 14cm

I won't post the instructions here out of respect for the thread starter's hard work, but you can figure it out pretty easily from the online tutorials and adapt accordingly. I whipped this out in less than 1 hr.

The jersey knit material was a half-yard that I purchased at Chinatown early last year...I loved how thin it was and it draped beautifully, so I knew I could make a beautiful dress out of it....a no-brainer why I used it for this dress! I am quite busy, what with having to think about wedding preparations, flat stuff, commissions and a TOP SEKRET PROJEK (haha I'll reveal that in due time of course!) but I get teased quite a bit by Asuka and the fiance for dressing Clover in "auntie" or "office lady" style clothes so it was IMPERATIVE that Saffron have something more suited to her! 

=============================================
Review, and final thoughts
=============================================
Overall, I'm a super-biased reviewer since she's been my grail doll....that and I had many pleasant surprises like the detail in her hands (nails!), and how quickly she arrived after receiving notice of her tracking information.  But there are a few things of note:

Positives
- The fresh skin resin is very heavy and lovely....my doll did not have any apparent cracks, faults nor stains
- eye colour that I wanted
- came assembled
- super easy to pose and stands very well
- SHE'S FINALLY MINE
- ALL MINE
- MUAHAHAHA

Mehs
- The default Sist face plate does not sit well in the head mechanism, and I had to sand down some parts so it would 'catch' properly, and also reduce the risk of cracking the faceplate
- Some of the mould seams/flash lines were pretty sharp, and my guess is they probably gave it a cursory run down the seams with a penknife, but I knew I would wet sand it anyway so didn't bother me too much
- Elastic strings seem a little loose...but I plan to suede the joints so she'll hold poses a little better


Okay! PHEW. I hope you enjoyed this post, please comment to let me know it was worth all my hard work!

(or you know, so I feel less stupid for 'talking' to myself...............)

p.s. I named her after my favourite character in "Absolutely Fabulous". That, and as Asuka pointed out, Clover-tea and Saffron-tea works perfectly together!

Wednesday, November 20, 2013

Miniature Swing Set in 1:4 (MSD) scale

As a 'treat' to myself (and Clover) for working hard for SGDC2013, I decided to take some time out for a personal project....a swing set for Clover! Been meaning to make one for like, forever, but given the scarcity and cost of materials here in SG, I've put this project aside. Recently, Daiso has re-stocked quite a lot of different wood materials, and so....a night and a morning later.....Clover has a new toy! XD

/rantmode on

FIRST OFF. NO TUTORIAL. NO PLANS. If ever I do come up with some (if that is at all possible with my attention span), it would be a paid one anyway, cos it is a lot of work. THAT IS ALL.

/rantmode off

I don't have a fixed way of doing stuff, seeing as how plenty of improvisation is necessary (mostly cos I mess up. A. LOT.), it all starts with a vague idea of what has to be done, vague measurements based on my favourite numbers, a cursory glance at google images, and powered by very little patience and a whole lot of tenacity.....it starts off.....


like this. YUH USELESS CRAP. I CANNOT DRAW TO SAVE MY LIFE. laugh at my primary school long division method, but yes, i'm even too pre-occupied to reach for my phone-calculator. :(

so. off to google.....and .....nada. I wanted something foldable thinking I could bring it out.....*manic laughter* SO MUCH FOR THAT. HOWEVER!!! it did throw up something interesting:

https://us.readersdigest.com/images/offer/fh/project_plans/pdf/FH01SEP_PatioChair.pdf

So. Since I have no fancy-shmancy woodworking tools nor a laser cutter *whines* I decided to wing it and modify it as I made it up in my head.....

this is what I had to work with. forgot to include sandpaper. protractor, right-angle L-shaped ruler/square (get 'em from greedbay or hardware stores), pencil, ruler, nippers/pliers (?!), pins, pin vise, small drill bits (DAISO!!!) and saw/mitre (need a new one :(, Art Friend )

mehhehe a vanity shot of how I arrange my bits *snort*. these are straws hot-glued onto the lid of a Daiso box :D

speaking of Daiso.....here're the materials I used. more for personal reference.

and a level (?) which holds my bank dongle-thingummies on my whiteboard for majority of the year :-/ ALSO FROM DAISO ROARRRRRRRRRRRRRR yuh my typing/worktable is not level :(

so I fudged up the chair bit, totally forgot that I had mentally made an earlier modification to it and only a few mins after I glued down the final planks, did I remember. :( By that time, it was near impossible to rip off the support planks without damaging it, and so,

NOTE TO SELF: PLEASE REMEMBER TO REVERSE THE SUPPORT BEAMS KTHXBYE

so it is a fixed-seat rather than a portable one SIGH. ANYWAY. if you don't understand what the above was about, no worries, cos this isn't meant to help anyone but myself HAWHAW *miserable groan*

while searching for those screw type eyepins at a jewellery findings place at Peoples' Park Centre, these handy little clasps seemed like a nice find, for 1 buck, buy 1-get-1-free, WOOOTAGE. WHY THE HELL NOT EH! Chain from my earlier beadworking-jewellery making days. FINALLY they get put to good use.

they're really fidgety and slippery though. takes quite a bit to work with. as for the loop holding up the seat, it's actually a headpin wedged between the two support beams.


if you're wondering what angles I used for the support, the 2 base angles are at 70 deg. eh. my fave number is 7, go figure. the hardest part was getting the damned swing level. ON MY UN-LEVEL TABLE. which I'd forgotten was, unlevel, that is. things went much smoother after I set it on the floor :-/ =_=""""

The whole contraption is about 40cm tall x 10inches x 28cm deep. I told you, I make do and make things up as I go along T-T Enforced every single glued section with pins. There's a technical term for this which evades me.....HALP!

All in all, pretty pleased with it. Waiting for the glue to dry for 24 hrs before I give it a coupla coats of wood varnish :)

YOU LIKE?????????????????????????????

(please excuse the manic tone, back from my weekly swim and the MONSTER MUNCHIES IS DRIVING ME NUTS) HORMONES RAWRRRRRRRRRRRRRRRRRRRRRRRR

p.s. OH YA only suffered 1 injury, forgot my thumb isn't impervious to pins.....lanced it and stupid thing took ages to stop bleeding, so I spent a number of minutes with my arm above my head this morning GYAAAA.

Saturday, February 16, 2013

DIY BJD Holder/Sleeve/Thingamabojiggy (??!) - a sort-of-tutorial that isn't really


Clover is in her coffin :P

There was a gathering yesterday for doll owners in a facebook group I'm in, but I had no proper bag nor face protector for Clover :( Since I'm always broke and not that many readily available items catch my fancy (especially if it's something i -think- i can make :X ), I told myself that if I could make a bag/protector for Clover in time for the dollmeet, I'd go :) 

Many helpful owners chipped in with suggestions of using a clean towel, bubble wrap, shoe bag etc, and although I didn't own the latter and am not short of clean towels & bubble wrap, having no face protector meant I risked crushing her eyelashes :( 'sides. i was itching to stitch, having held back due to time constraints and the fact that my new machine will be arriving on MONDAY OMG OMGOMGOMG

it's been a long time since i exercised any sort of 'planning muscle' in my brain. first 2 drafts of how i wanted to construct the holder didn't seem to work, and after fiddling about with some ideas, went with the simplest. decided to modify as i went along :)

Top considerations for me were:
- compact, and fit in most of my bags
- sturdy so she doesn't flop around
- protect her face, especially her eyelashes
- waterproof if possible, but that was dependent on materials on hand
- easy to store/remove doll
- machine washable

here're the materials i planned to use for this project, clockwise from top left:
- Daiso material, it feels sleek and possibly waterproof, think it is nylon. has been part of my stash for at least 2 years, loved the print, am SO GLAD it finally got put to use
- white lightweight fabric purchased on the cheap for drafting prototypes, might be polyester
- batting for quilts, with interfacing for stiffness
- 1.5mm thick plastic (polypropylene?) sheets (Daiso)
- green ribbon was some random remnant i had kept and it seemed to work with my fabric choices, but did not wind up using -_-"

 just a note: I hadn't realized this one had the interfacing until i got home and examined the package. which is fine by me, wanted the added stiffness for the part that didn't have the board insert ^ ^ quilting fabric could possibly be much cheaper elsewhere, but i didn't want to travel again and small amounts suit me just fine until i need more.


although these are the measurements i started out with, i modified along the way i.e. shortened the length. used a pair of gardening shears to cut through the plastic as it's pretty stiff, and from past experience, hell to cut through with a penknife. that and i really didn't want another piece of flesh missing from me :S

(not that it's a far removed possibility with the shears, but i digress)

 test fit the pieces, yay they work~

looks too small?

 newp! it's all about perspective :P

size is good for use with my favourite grocery bag!
(given to me by my cousin, she had entered in a local magazine competition and her design won!)


test fit again~ didn't feel like doing too much math and measuring


estimated the length of batting required, which came up to approximately 17 inches across and 14 inches wide. i planned to stitch across the batting on the sides to hold it in place before i turn the fabrics inside out.

 fabric marker works great on the batting

added about an inch around all sides, cut out my printed fabric, then did the same for the white (lining) fabric. do take note which direction you'd like your prints to be in by test wrapping again if need be.

totally forgot to take pics of how I layered the fabrics as I was rushing this project.

batting
lining
printed fabric (print facing up)
batting

at this point, it might be a good idea to attach any ribbons or whatever else you might choose to tie up the bundle if you so wish, in  between the lining and printed fabric. I opted out of this as the idea of fiddling with ribbons just seemed like too much work each time i use the 'pouch'.

folded in the side where i would be slotting the plastic pieces in. at this point i hadn't yet decided if i wanted to stitch over the edge yet, and since i had deliberately aligned the material such that it wouldn't need to be hemmed (no fear of fraying) i figured i could leave that decision till the end.

for neater results, i always iron my fabrics and rough hand-hem (don't know the actual term?) rather than use pins. i think this extra effort is especially important when sewing smaller pieces, since 
a) crappy machine,
b) n00b at miniature sewing,
c) rusty sewing skills :(
for the two sides, i stitched on top of the batting to secure it in place

and because i wanted a less puffy sides, the top (bottom?) edge was simply stitched across the 2 fabrics, as closely to the batting and using the edge as a guide

my corners looked something like this (yeah i ran over the last few stitches again out of habit)

i didn't have a hemming/serger foot, so i just did a zigzag stitch around the edge and trimmed excess fabric. not sure if this actually would help reduce fraying, which didn't matter anyway since I finally decided to do a once over stitching around the perimeter.

turned it out to reveal..............that i had spent 2 hrs to sew a stupid puffy rectangle.

XD

forgot to mention, i snipped the corners at a 45deg angle to the edge of the fabric(as close to the stitches, but take care not to snip away the stitching) so that the corners would be sharper after it got turned out. more experienced uhm seamstresses (??) probably know this already.


ANYWAY. moved on. again, no strict measurements, so i placed my plastic pieces inside, giving it a little bit of allowance and roughly stitched in as straight a line as possible so it would act as a guide

 at this point i had already ironed and stitched over all edges (including the slot edge, though that was done like you would stitch around the mouth of an opening etc hope you understand what i mean


 rough stitching with contrasting thread for easy detection for removal later

 keep going.....

PEDAL TO THE.....ceramic tile floor? XD
(man my jokes are lame, not that it matters if nobody understands me.)


OKAY! time to insert the plastic pieces! i snipped off the corners so it wouldn't snag
(oh yeah remove the rough stitches before you insert mmkay, as usual forgot to take pics in sequence sigh)


taran taran~! almost done! the plastic rests pretty firmly against her forehead, protecting her faceup and eyelashes ^ ^ (though i really should remove that clip lest it scratches her face :X)


cos i started losing steam at this point (was close to the 4 hr mark at 1pm -LUNCHTIME- and I had woken up at 5 that morning), i decided to just make 2 elastic bands to hold everything together. simply measure around the bundle + doll, lighter seal the frayed edge, overlap by approx 1 inch (btw i used a 1" elastic waistband) and stitch.

BE CAREFUL NOT TO STITCH ON THE THICKER PARTS/EDGE OF THE ELASTIC LIKE I DID my needle snapped into 3 pieces :O gave me a rude shock it did.

(speaking of which, i'm also losing steam on this post, took almost 1.5 hrs to do it sans breakfast zzzz)

This tutorial could probably apply to any sized doll, provided you can find sturdy enough material, or maybe cut 2 pcs of the inserts instead of 1 whole piece, etc etc. Cardboard could be used in place, since it's constructed to be removeable before wash.

Apologies if you thought it was going to be more comprehensive or precise with measurements and such, but as you know, i'm all for adaptibility and would rather pick up techniques than measurements :P

Hope this will be useful to some of you, do share with your friends (I have some buttons greyed out below this post, you can use those! wonder if it ever gets noticed) etc etc if you have found this interesting :) Would appreciate credits and a linkback if you ever decide to make one of your own!

~~~~~~~~~~~~~~~~~~~~~~~~~~~~~~~~
Additional suggestions from friends from the dollmeet:
- add handles (would be handy, and could even add a handlewrap thingy to hold it together!)
- velcro (i hate the sound of velcro ripping and avoid it like the plague)
- make many and stack up like a honeycomb (LOL how many dolls do they own OMFG!>?!? but LOVE this idea!!!! can you imagine?!?!? how amazing that would be!!!)

Personal notes:
- add elastic strap to base to secure doll before wrapping up
- lace trim to sides
- possibly push buttons to secure top flap, but elastic band might be better depending on how fluffily clothed doll is
- since plastic boards were used, could simple sew across the edge to secure in permanently, but i prefer to have an option to remove it for versatility. wonder how the batting would hold up with constant removal. 
- re: above, try for more fabric layers to protect batting layer?!?!?! thicker is okay too for added protection!
- man i remember i had so many other fabulous ideas but right now i think i need breakfast