


it was a frustrating and time-consuming process though, I had thought to myself many times that it might have been easier to scratch build a chest of drawers, but the process revealed to me how it was constructed, so that was a necessary evil.


Decided to use doublesided tape for every single part of this project.

wasn't too difficult, didn't need to take that many measurements either, just sort of 'winged it'. there were a few mistakes, but i didn't mind so much as this isn't for sale, and I don't think anyone else would care to take a closer look XD


stickstickstickcutcutcut....many hours later.........TADAH. looking good!
(btw you probably already know you can click on my photos to have a closer look)
((just don't look too closely ok))

I wanted to give it legs as well, so it would look like a real life chest-of-drawers, and not a pastlifemooncakeboxchest-of-drawers. Used some wooden blocks purchased from Daiso!

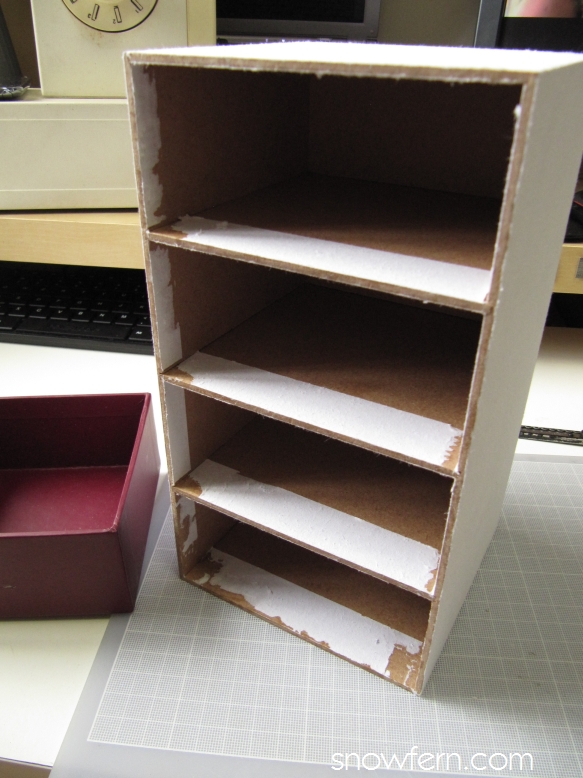
test fit! and thus concludes Day 1 of the chest of drawers.


although the shelving portion looked pretty good by itself, and because I had a slight run-in with the penknife, I was tempted to leave it as-is. But of course, I couldn't leave this unfinished. so I pushed on the next day while waiting for my cousins to visit.

here's my jig, i don't have any fancy woodworking stuff, even my stupid plastic mitre is inaccurate and rather cumbersome to work with. rely mainly on a razor saw and lots of sanding.


(btw never ever ever work with sharps when you're tired! of course, I never ever ever heed my own advice.......and I'd run out of bandaids so I taped a cotton pad around my finger to staunch the bleed XD). for those who are squeamish about wounds, please skip the next photo :P
SQUEAMISH PEOPLE DO NOT....ah it's not that bad, THE DRAMA QUEEN STRIKES AGAIN
:P

I initially used just wood glue and that pin thingamabojingy, but i figured it wouldn't be strong enough to withstand my constant use, so I reinforced the joint with 5-min 2-part epoxy (you can get it at any hardware store).


used a hole punch + hammer to put holes in the front, another scrapbooking paper for the front (i even made sure to line up the design in the order it was cut from the sheet :P ) then used lego pieces to make sure the handles were all evenly set in place while the epoxy glue set. it's still kinda shaky as the holes were a tad large....will sort that out another day (probably never XD at least until the handles fall out). I guess if I were to improve it, I would construct the pull portion a little better, but whatever. it is serving its purpose now :P


I love how it turned out :)


even chanced upon a pen holder that might work either as a rubbish bin or laundry basket XD


I put it all in her new 'room'! apologies for the crappy photos, new space = me having to figure out all the lighting stuff :( GRAGHGHGHHGGh


OKAY! Hope you've enjoyed this lengthy post. Comment please, so I don't feel as if I'm always talking to myself T_T
I'm pretty sure you're magic.
ReplyDeleteI cannot believe how productive you are! It's very inspiring. I should really get off my butt and start on rooms for my girls...
The dresser came out really well, I love the paper you chose for the front. :)
Cool idea with the moon cake box~~~~ Love the small dollhouse too~ she looks so real playing with the doll house XD
ReplyDeleteLOL you know earlier this year I might have beat your bandaid record :P It's odd, cos past years I don't remember using as many =_=
ReplyDeleteI think you did a great job
ReplyDeleteMelissa, DO IT DO IT MAKE MAKE MAKE! (then remember to SHOW SHOW SHOW!!!) XD I love that paper too, was an impulsive buy at the scrapbook store, glad I could finally put it to use!
ReplyDeleteThanks bunbun! I think the mooncake box kind of screams to be converted eh!! i <3 that dollhouse too am sooo happy it's the perfect size for her ^ ^
ReplyDelete(i think bf got it from a random bookstore locally ley, get one for your dolls too?? he didn't tell me where or how much and i neglected to ask :S)
HEE HEE Chun....omg really?!??! o.O from cooking or sewing?!?! i get injured in the stupidest ways, it's not even worth discussing. gah.
ReplyDeleteThanks Marisa! ^ ^
ReplyDeleteImpressive blog, great post as well.Discount Beds and Mattresses
ReplyDelete